Creating a real-time Trello board with Phoenix LiveView-Part-2
A
I am a Software Engineer from Mumbai, India. In love with Functional programming ( precisely Elixir). Love to share the knowledge that I learn while developing things.
Search for a command to run...
Hello @Serguei Cambour, thanks for reporting the issue. I'll fix the issue ASAP. Also, I am sorry for not writing the final installment yet because of my hectic schedule. But I'll surely be completing the third installment in the next 2-3 days.
AbulAsar S., no worries, by the way, the code in the repo contains the correct version :).
Hello Abul, awesome blog! Congrats!
Motivation Recently, I tried to learn some low-level system programming stuff. I am a Mac user, and I thought that everything that works on Linux should also work on Mac. After all, Mac is a Unix-based system 😊. I guess we all heard this. Oh boy! I ...

Problem Statement While working on a Nestjs project, I encountered a weird problem related to the database column. I was trying to insert a record into a MySQL table using TypeORM. The error I was experiencing stated that a specific column “cannot be...

Recently, I was exploring design patterns courses on my LinkedIn Learning subscription. I came across a course, Node.js: Design Patterns by Alex Banks. It is a wonderful, easy-to-understand course. I started with the Builder Pattern, and the explanat...

Suppose you are working on a table in a LiveView project. This table has limited static data of not more than one page (you can avoid questions about pagination in the comment section 😊). From a user's point of view, it becomes hard to look into the...

Recently, while working on one of my personal Elixir projects. I came across a scenario where I needed to make some changes to the database schema.The changes mainly revolve around adding and removing indexes due to changes in the business requiremen...

This blog is a continuation of a three-part blog series on creating a real-time Trello board. This is going to be part 2 of the series. In the previous blog, we designed and implemented the API layer of the application. We added two tables i.e User and Task and also added the structs for the two tables. We've added and tested the API layer in the iex shell and it is working as per our expectations. In this blog, we are going to add the Trello board, Task cards, and integrate the functionalities with the previously designed API.
This is a 3 part blog series.
Part 1: We will be generating the application, adding the different tables, and the API layer, and we will test the API layer in the iex shell
Part 2: We will build the board, add tasks UI, and integrate the board with the functions (API) we created in Part 1 (This is Part 2)
Part 3: We will be adding real-time behavior to our board (under development)
Getting the board and card UI ready ✓
Adding drag and drop feature to cards ✓
Adding JS hook and integrating with the UI✓
Integrating the UI with the API ✓
As per our planning, in this part of the series, we have to create our Trello board with cards and drag-drop functionality.
We are going to add our dashboard in our root URL of the application.
For this, we will open router.ex and add the following code
scope "/", TrelloAppWeb do
    pipe_through :browser

    live "/", HomeLive
end
We have registered the root URL i.e / with the home_live file.
Now, create a file trello_app/lib/trello_app_web/live/home_live.ex and add following code
  defmodule TrelloAppWeb.HomeLive do
    use TrelloAppWeb, :live_view

    def mount(_params, _session, socket) do
      { :ok, socket }
    end
  end
Before creating any view of the LiveView we will add some styling for the board and the cards.
Open the app.css file in the assets folder and paste the following CSS stylings.
  html {
    font-family: sans-serif;
    background: #b1dade;
    color: #4a6064;
    font-weight: 400;
  }

  body {
    margin: 0;
  }

  * {
    box-sizing: border-box;
  }

  h1, h2, h3, h4, h5, h6 {
    font-weight: 400;
  }

  h1 {
    margin: 0;
    background: #303945;
    color: #fff;
    font-weight: 400;
    padding: 0.5rem;
    font-size: 1.2rem;
  }

  main {
    display: flex;
    flex-direction: column;
    height: 100vh;
    overflow: hidden;
  }

  .fullwidth {
    width: 100%;
  }

  .board {
    flex-grow: 1;
    width: 100%;
    padding: 1rem;
    overflow: scroll;
    display: flex;
    align-items: flex-start;
  }

  .list {
    margin: 0;
    min-width: 14rem;
    flex-basis: calc(100% / 6 - 1rem);
    padding: 0;
    list-style: none;
    margin: 0.5rem;
    background: #e7f3f4;
    color: #4a6064;
    border-radius: 0.2rem;
    overflow: hidden;
    padding-bottom: 8px;
  }

  .list-form {
    margin: 0;
    min-width: 14rem;
    flex-basis: calc(100% / 6 - 1rem);
    padding: 0;
    list-style: none;
    margin: 0.5rem;
    background: #e7f3f4;
    color: #4a6064;
    border-radius: 0.2rem;
    overflow: hidden;
  }

  .list-form form {
    padding: 0.5rem;
  }

  .list-form form > * + * {
    margin-top: 0.5rem;
  }

  .list-form h2,
  .list-header {
    font-size: 0.8rem;
    font-weight: 600;
    margin: 0;
    padding: 0.5rem;
    padding-bottom: 0;
  }

  .list-footer {
    margin-top: 0.5rem;
    padding: 0.5rem;
    overflow: auto;
    background: #ddeff0;
    color: #4a6064;
  }

  .card {
    margin: 0.5rem;
    margin-bottom: 0;
    background: #fff;
    color: #4a6064;
    padding: 0.5rem;
    border-radius: 0.2rem;
    height: 100px;
  }

  .card:first-of-type {
    margin: 0;
  }

  .card a {
    color: inherit;
    text-decoration: none;
  }
Now, add a file home_live.html.heex in the same folder(of home_live.ex) and add h1 tag with some random message for testing purposes.
As per our design we want three columns planning, progress, and completed to display our cards. Refer to the below image to get an idea.
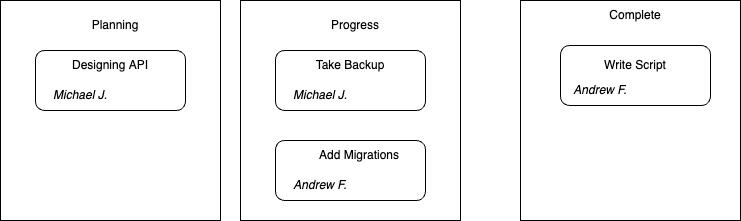
Now, in the home_live.html.heex add these three columns with id as per the status.
<div class="board" id="trello-board">
    <ul class="list" id="planning">
        <div class="list-header"> Planning </div>
    </ul>

    <ul class="list" id="progress">
       <div class="list-header"> In Progress </div>
    </ul>

    <ul class="list" id="completed">
       <div class="list-header"> In Progress </div>
    </ul>
</div>
If you remember we have created a function get_grouped_tasks/0 in the Project context.
We will assign the value of this function to the assigns in the mount function and later will iterate over these values in the view.
In the mount function of the home_live.ex, add the following code.
  defmodule TrelloAppWeb.HomeLive do
    ....
    alias TrelloApp.Organization

    def mount(_params, _session, socket) do
      tasks = Organization.get_grouped_tasks()
      {:ok, assign(socket, tasks: tasks)}
    end
  end
We added an alias of the Organization context and assigned tasks to the socket using the get_grouped_tasks function.
If you remember get_grouped_tasks returns key-value pair of task status as key and a list of tasks as value.
Something like this
%{
  "planning" => [
      %TrelloApp.Organization.Task{
        __meta__: #Ecto.Schema.Metadata<:loaded, "tasks">,
        description: "designing api",
        id: 2,
        inserted_at: ~N[2022-08-25 09:30:08],
        state: "planning",
        title: "Designing API",
        updated_at: ~N[2022-08-25 09:30:08],
        user: %TrelloApp.Organization.User{
          __meta__: #Ecto.Schema.Metadata<:loaded, "users">,
          first_name: "Michael",
          id: 1,
          inserted_at: ~N[2022-08-25 08:45:25],
          last_name: "holding",
          tasks: #Ecto.Association.NotLoaded<association :tasks is not loaded>,
          updated_at: ~N[2022-08-25 08:45:25]
        },
        user_id: 1
      }
  ],
  "progress" => [
      // two tasks under progress
      %TrelloApp.Organization.Task{ id: 2 },
      %TrelloApp.Organization.Task{ id: 3 }
   ],
   "completed" => [
      // one task under completed
      %TrelloApp.Organization.Task{id: 4}
   ]
}
  <div class="board" id="trello-board">
      <ul class="list" id="planning">
          <div class="list-header"> Planning </div>
          <%= for task <- @tasks["planning"] || [] do %>
             <li class="card">
                <a href><%= task.title %></a>
                 <i><%= full_name({title.user}) %></i>
              </li>
          <% end %>
      </ul>

      <ul class="list" id="progress">
         <div class="list-header"> In Progress </div>
         <%= for task <- @tasks["progress"] || [] do %>
             <li class="card">
                <a href><%= task.title %></a>
                 <i><%= full_name({title.user}) %></i>
              </li>
          <% end %>
      </ul>

      <ul class="list" id="completed">
         <div class="list-header"> In Progress </div>
         <%= for task <- @tasks["completed"] || [] do %>
             <li class="card">
                <a href><%= task.title %></a>
                 <i><%= full_name({title.user}) %></i>
              </li>
          <% end %>
      </ul>
  </div>
drag and drop feature to our board.I wanted a vanilla javascript library that should be lightweight and highly supportive in the js community. While doing some research I came across sortable-js. Let's install it in the application. Navigate to the assets directory by running cd assets then run
npm install sortablejs --save
I went through sortablejs documentation and came across a create method which can help us to move the cards from one point to another.
It takes the element reference of the column that you want to be sortable as the first argument and the second argument will be an object with different properties you want to apply(as per documentation).
    Sortable.create(planning, {
        group: 'shared',
        animation: 150,
        sort: false,
        onEnd: function (/**Event*/evt) {}
    });
onEnd callback is where we have to do all manipulation. It is going to execute as soon as we drop the card on the other column. It has one event parameter which will have all information like the detail of the dragged element and the column where it is dropped.We've discussed the onEnd callback in the create method. It has some information about the dragged element and the point where it is dropped.
We are going to add a data property with the name task-id and value as id of the task on each card. Notice, the data-task-id property in the li tag.
    <%= for task <- @tasks["completed"] || [] do %>
       <li class="card" data-task-id={"#{task.id}"}> <==Notice this
          <a href><%= task.title %></a>
           <i><%= full_name({title.user}) %></i>
        </li>
      <% end %>
This data-task-id will act as the information of the element that is being dragged.
Also, if you remember the id on each column i.e ul tag, will act as information where the card is being dropped.
<ul class="list" id="completed">
onEnd callback we can access id and taskId as follows console.log(`Id: ${evt.to.id}`)
console.log(`taskId: ${evt.item.dataset.taskId}`)
We have installed sortablejs and discussed the method and made some changes in the Html to make it work with our javascript logic. Now, we will add the javascript logic. We will add a mounted callback, which is called and initialized with some initial value as soon as the element on which we are applying it is mounted in the DOM.
Let's add a file in trello_board.js in assets/js folder.
We will initialize Sortable.create for all of the three columns. We will get all of the three columns using document.getElementById('column_id'). Refer to the code below.
  import Sortable from 'sortablejs';

  TrelloBoard = {
    mounted(){
      const planning = document.getElementById('planning')
      const progress = document.getElementById('progress')
      const completed = document.getElementById('completed')
      const pushEvent = (target, taskId) => {
        this.pushEvent("move_task", {target, taskId})
      }

      Sortable.create(planning, {
          group: 'shared',
          animation: 150,
          sort: false,
          onEnd: function (/**Event*/evt) {
            pushEvent(evt.to.id, evt.item.dataset.taskId)
          }
      });

      Sortable.create(progress, {
          group: 'shared',
          animation: 150,
          sort: false,
          onEnd: function (/**Event*/evt) {
            pushEvent(evt.to.id, evt.item.dataset.taskId)
          }
      });

      Sortable.create(completed, {
          group: 'shared',
          animation: 150,
          sort: false,
          onEnd: function (/**Event*/evt) {
            pushEvent(evt.to.id, evt.item.dataset.taskId)
          }
      });
  }
 export default TrelloBoard
Everything seems similar to what we discussed earlier, except the pushEvent function.
This function is initialized on the fourth line of the mounted function and it takes target and taskId as the parameter and creates an event "move_task"usingthis.pushEvent` function and passes these two parameters as an object.
At last but not least we will include our TrelloBoard hook in our LiveSocket. For this, we will open the app.js file and import TrelloBoard and include it in our Hooks object, and add the Hooks to our LiveSocket constructor as follows.
    import TrelloBoard from "./trello_board"
    let Hooks = { TrelloBoard }

    let liveSocket = new LiveSocket("/live", Socket, {params: {_csrf_token: csrfToken}, hooks: Hooks })
    # Notice `hooks: Hooks`
To call our Javascript logic i.e hook we’ll add the phx-hook attribute on the Trello board with value as the hook name i.e TrelloBoard where we want to perform our drag-drop operations.
<div class="board" id="trello-board" phx-hook="TrelloBoard">
  <ul class="list" id="planning">
    <div class="list-header"> Planning </div>
      .........
      .........
      .........
   // Remaining UI code
</div>
move_task event in LiveViewIn our javascript hooks onEnd callback we created a pushEvent named move_task which also sends target and taskId.
In LiveView, the events which are sent by the client using pushEvents can be handled using handle_event.
Open the home_live.ex file and add the following function.
  defmodule TrelloAppWeb.HomeLive do
     .........
     .........
     .........

    def handle_event("move_task", %{"target" => target, "taskId" => taskId}, socket) do
        Project.change_task_state(taskId, target)
        {:noreply, socket}
    end
  end
As you can see in this handle_event function we are extracting target and taskId using pattern matching.
Later, we used the change_task_state/2 function(which we created in Part 1 of this blog series) and passed the taskId and target parameters to the function.
This not only moves the card in UI but also persists the state in the database.
This completes the second blog of this series. In this part, we build the board, add tasks UI along with drag and drop functionality and integrated the board with our API layer. In the next part, we will make our Trello board in real-time. I hope you like this blog. If you have any questions then please comment below. Thanks for reading 😊.