Creating a real-time Trello board with Phoenix LiveView-Part-1
Trello cards help you to collaborate, manage projects, and reach new productivity peaks(As per their official Website 😊). You may have used it earlier or some similar board like Jira to manage projects and tasks. When I joined one of my previous organizations, my training was tracked using the Trello board which helped me and other new joiners in learning and track our progress. In this Blog, we are about to create a similar board with a real-time update feature.
What are going to build?
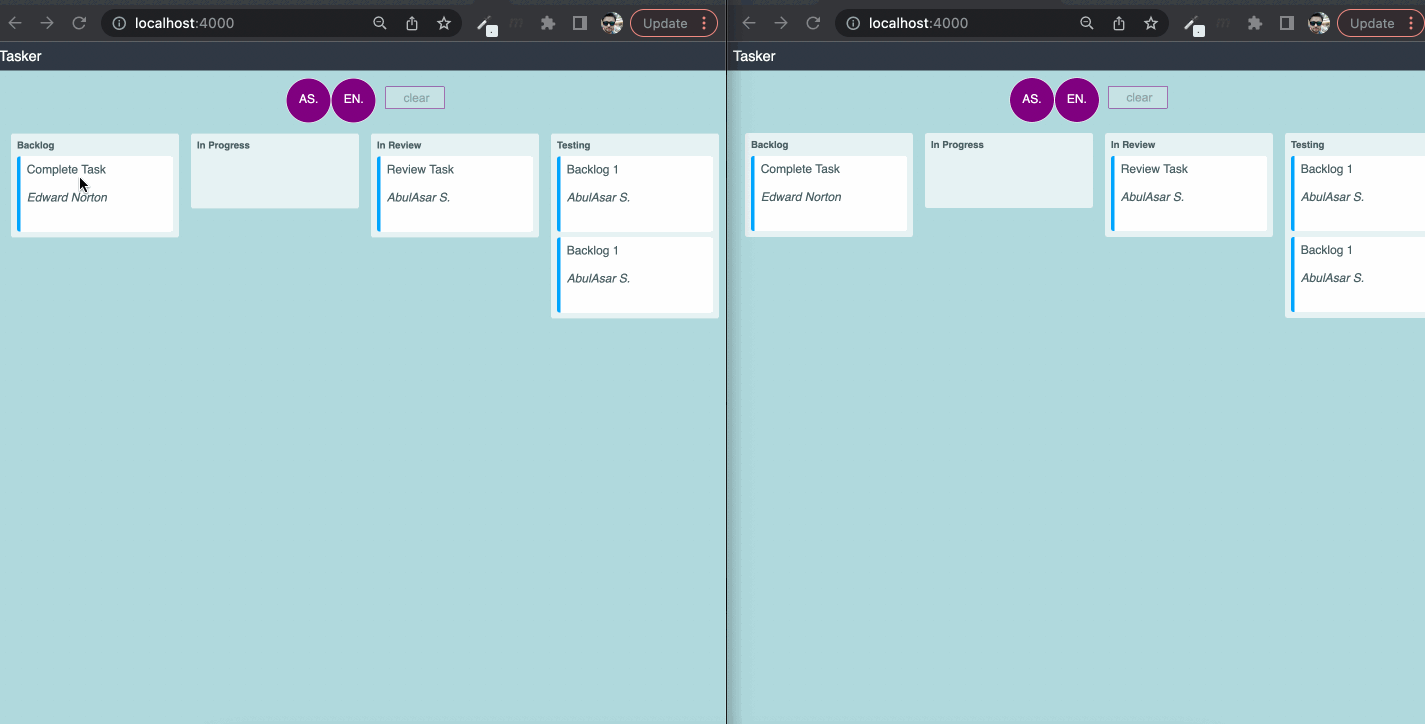
We are going to build a Trello look-alike board. It will have different cards belonging to different sections. We can drag and drop cards to different sections with a smooth transition. Along with the drag-and-drop transition of cards to different sections, the whole experience will be real-time. If any user makes any change in the card section then any other user watching the application screen doesn't have to explicitly refresh the browser to see the effect. Refer to the gif below to get an idea.
Blog series!!!
This is a 3 part blog series.
- Part 1: We will be generating the application, adding the different tables, and the API layer, and we will test the API layer in the
iexshell (This is Part 1) - Part 2: We will build the board, add tasks UI, and integrate the board with the functions (API) we created in Part 1
- Part 3: We will be adding real-time behavior to our board (under development)
Action Plan
- Creating a LiveView project
- Adding User and Task Tables.
- Adding Task and User struct
- Designing the API Layer
Let's start building 👷
Creating LiveView project
- First of all, our system should have Elixir installed. We can confirm this by running
Elixir -v. - Once confirmed we need to create/generate the Phoenix LiveView application.
- This can be done by running
mix phx.new trello_app --live - if you get this error
** (Mix) The task "phx.new" could not be found Note no mix.exs was found in the current directorymix archive.install hex phx_new - Then navigate to project directory
cd trello_appand runmix phx.server. Once, the project starts running navigate to localhost:4000 to see the welcome phoenix screen.
Adding User and Task Tables.
- As per our requirement, we have two entities that need to be created, the
cardand theuserto which this card belongs. We will call these cardsTask. - So, we will add two tables the
Usertable and theTasktable. - Let's add migration files for these two Tables.
- For the sake of clarity we will add two separate migration files for these two tables.
- For
Usertable runmix ecto.gen.migration create_userand forTasktable runmix ecto.gen.migration create_task Now open
trello_app/priv/repo/migrations/{{some_time_stamp}}_create_user.exsmigration file at and the add following fields in the migration file.defmodule TrelloApp.Repo.Migrations.CreateUser do use Ecto.Migration def change do create table(:users) do add :first_name, :string, null: false add :last_name, :string, null: false timestamps() end end endSimilarly for
tasktable opentrello_app/priv/repo/migrations/{{some_time_stamp}}_create_task.exsmigration file and the following fieldsdefmodule TrelloApp.Repo.Migrations.CreateTask do use Ecto.Migration def change do create table(:tasks) do add :title, :string, null: false add :description, :text add :user_id, references(:users) add :state, :string, null: false timestamps() end end end- Now we will now run the command
mix ecto.migrate. This will create tablesUserandTaskin the database.
Adding Task and User struct
- We have created
UserandTasktables now we are going to addUserandTaskstructs so that we can useEctoqueries effectively. - First, we will add the
Taskstruct. For that we will create a filetrello_app/lib/trello_app/organization/task.ex. Add the following code to the file.
defmodule TrelloApp.Organization.Task do use Ecto.Schema import Ecto.Changeset alias TrelloApp.Organization.{ Task, User } schema "tasks" do field :title, :string field :description, :string field :state, :string belongs_to :user, User timestamps() end def changeset(%Task{} = task, attrs) do task |> cast(attrs, [:title, :description, :state, :user_id]) end end- Similarly, we will add the
Userstruct in the same organization directory with a file nameuser.ex. We will add a similar code here as well.
defmodule TrelloApp.Organization.User do use Ecto.Schema import Ecto.Changeset alias TrelloApp.Organization.{ Task, User } schema "users" do field :first_name field :last_name has_many :task, Task timestamps() end def changeset(%User{} = user, attrs) do user |> cast(attrs, [:first_name, :last_name]) end end- In the above code, both the structs i.e
UserandTaskhas fields defined in theschemamacro similar to the migration files. - We've also defined the relationship between the structs(Tables). It is a
one-to-manyrelationship betweenUserandTaskwhich meansUsercan have manyTask. We've also defined thechangesetfunctions for manipulating the data. - Now, to test if everything is working fine we will add some dummy data in both the tables using the
iexshell. - Open the terminal and navigate to the root directory level of the project. Now run the
iexshell by typingiex -S mix. - Now alias both the structs and
Repoto avoid typing long struct names.alias TrelloApp.Organization.{ Task, User } First, we will insert the
Userrecord for that we will run the following code.User.changeset(%User{}, %{first_name: "Michael", last_name: "Jordan"}) |> Repo.insert User.changeset(%User{}, %{first_name: "Andrew", last_name: "Flintoff"}) |> Repo.insert- This will insert two
User'srecords withidof 1 and 2. Similarly, we will add a few
Taskrecords for bothusersbut with different states. For testing purposes, we will add four tasks with the states "planning", "progress", and "completed".%Task{} |> Task.changeset(%{title: "Designing API", description: "designing api", state: "planning", user_id: 1}) |> Repo.insert %Task{} |> Task.changeset(%{title: "Take Backup", description: "take backup", state: "progress", user_id: 2}) |> Repo.insert %Task{} |> Task.changeset(%{title: "Add Migrations", description: "write migrations", state: "progress", user_id: 1}) |> Repo.insert %Task{} |> Task.changeset(%{title: "Write Script", description: "write script", state: "completed", user_id: 2}) |> Repo.insert- After running the above queries we will have one
Userrecord and threeTaskrecords.
Designing the API Layer
- As per our requirement we only want two functions in our API Layer, which are
get_grouped_tasksandchange_task_state. What
get_grouped_taskswill do?- If you remember in the
Taskstruct we have astatefield. We've added threetasksrecords with stateplanning,progress, andcompleted. - We want our tasks should be grouped (as per the
statementioned in the task) and placed in the respectivestatescolumn.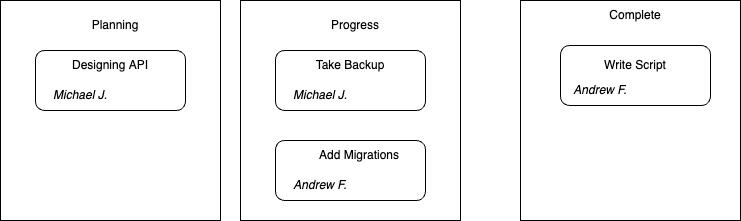
- In this function, we will have three stages of data transformation
- Fetch all tasks
- Preload the owner of the tasks (Just for beautification of the task to mention the owner of the task)
- Grouping the tasks
- Below is the code of the above pseudo-code.
def get_grouped_tasks() do Task |> Repo.all() |> Repo.preload(:user) |> Enum.group_by(fn %{state: state} -> state end) end - Our second method will be
change_task_state. What
change_task_statewill do?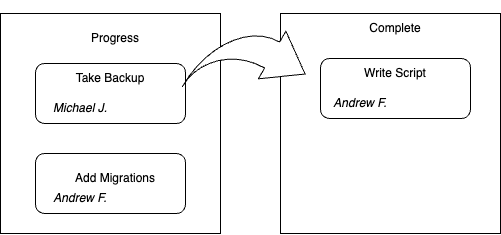
- When we move our task (say) from
ProgresstoCompleted, we want to change thestatefield of the task fromprogresstocompleted. - This function will take two parameters
task_idandtransition_statei.e thecolumnwe want our task should be moved. - In this function, we will have three stages of data transformation
- Get
taskbytask_idparameter - Change the
stateof thetaskas per providedtransition_stateusingchangesetfunction inTaskstruct - Update the
Task
- Get
- Below is the code of the above pseudo-code.
def change_task_state(task_id, transition_state) do Task |> Repo.get(task_id) |> Task.changeset(%{state: transition_state}) |> Repo.update end - We are going to place both functions in a separate module
organization.exundertrello_app/lib/trello_appfolder. This module will be the provider of the two functions, which we will use in the LiveView module later.
defmodule TrelloApp.Organization do
  alias TrelloApp.Repo
  alias TrelloApp.Organization.Task

  def get_grouped_tasks() do
    Task
    |> Repo.all()
    |> Repo.preload(:user)
    |> Enum.group_by(fn %{state: state} -> state end)
  end

  def change_task_state(task_id, transition_state) do
    Task
    |> Repo.get(task_id)
    |> Task.changeset(%{state: transition_state})
    |> Repo.update
  end
end
Testing the API Layer in the iex shell
- We've created our Task and User structs as well as designed our API Layer. Let's test the API Layer in the iex shell.
- If you remember, we've added a few records of
taskanduser. - So, as per our API layer, we have to functions
get_grouped_tasks/0andchange_task_state/2. First, we will testget_grouped_tasks/0, - For testing, we will alias the
Organizationmodulealias TrelloApp.Organization - Now run
Organization.get_grouped_tasks(), this will return grouped tasks as per theirstates%{ "planning" => [ %TrelloApp.Organization.Task{ __meta__: #Ecto.Schema.Metadata<:loaded, "tasks">, description: "designing api", id: 2, inserted_at: ~N[2022-08-25 09:30:08], state: "planning", title: "Designing API", updated_at: ~N[2022-08-25 09:30:08], user: %TrelloApp.Organization.User{ __meta__: #Ecto.Schema.Metadata<:loaded, "users">, first_name: "Michael", id: 1, inserted_at: ~N[2022-08-25 08:45:25], last_name: "holding", tasks: #Ecto.Association.NotLoaded<association :tasks is not loaded>, updated_at: ~N[2022-08-25 08:45:25] }, user_id: 1 } ], "progress" => [ // two tasks under progress %TrelloApp.Organization.Task{ id: 2 }, %TrelloApp.Organization.Task{ id: 3 } ], "completed" => [ // one task under completed %TrelloApp.Organization.Task{id: 4} ] } - We got one task for
planning, one task forcompleted, and two forprogress. This is exactly as per thetaskswe added with different states. - So far so good, now we will test
change_task_statefor firsttaski.e id=1. change_task_state/2expects two parameterstask_idandtranstion_state.- We will move our task with
id=1to thecompletedstate. So, we will runOrganization.change_task_state(1, 'completed')in our shell. - This will transition our task of
id=1to thecompletedcolumn. We can test this by again running theget_grouped_task. It will not return theplanninggroup since there is no task left with theplanningstate.
This completes the first blog of this series. In the next part as per our planning, we will build the board, add tasks UI along with drag and drop functionality and will integrate the board with our API layer. I hope you like this blog. If you have any questions then please comment below. Thanks for reading 😊.